Moving a Blog to Hexo

I started blogging using a self hosted version of a platform called Das Blog. It had two major attractions for me. It was an open source .Net application and it stored everything in XML files. Just ten years ago hosting was more expensive and often you were allowed only one database so the XML solution had an appeal. It worked well for years but it took a lot of time and headaches to update the blog when a new version of Das Blog was released.

After a few years of Das Blog operation I really didn’t have much on my blog. I incorrectly assumed that I would write more for the blog if I wasn’t spending time to update it. So I moved to a hosted WordPress solution.

A few more years down the line I took a Pluralsight course titled Build a Better Blog with a Static Site Generator by Jeff Ammons. The course description said you could make your blog load faster with a static website generator without resorting to hand written HTML. I’m bracket adverse so this sounded good to me. The course is great and inspired me to leave the WordPress world behind.

The course covers two different blogging platforms, Hexo and DocPad. Hexo is specifically designed for blogs and is simpler to implement so I went with that solution. Hexo is a node.js application that compiles a few configuration and template files, along with your pages written in Markdown text. The output is placed in a single folder which can be copied to any web server since it is only HTML and JavaScript. In the course Jeff shows how to update your site using Git. WordPress has an export function that creates Markdown files which I easily updated for the new site.

I’ll have to wait and see if actually blog more with Hexo but one bonus about the two conversions I have done is that each was a great opportunity to clean out outdated posts.

2015 France Photos

First days in Paris

Tuesday Afternoon

Wednesday on the Left Bank

Friday in ParisThe 4th arrondissement of Paris

Drive to Breuil

Château de Chantilly

Sunday Brocante (flea market) at Neuilly St. Front

La Ferte-Milon

In and near the country house

Sunrise at the Chateau

Reims Cathederal

Reims and the Ruinart Champagne Tour

The canal at La Ferte-Milon

Marolles

Cointicourt and the walk home

The Ruins at Fere-en-Tardenois

The Oise-Aisne American Cemetery and Memorial

The City of Fere-en-Tardenois

Repair of the Breville BOV450XL Mini Smart Oven

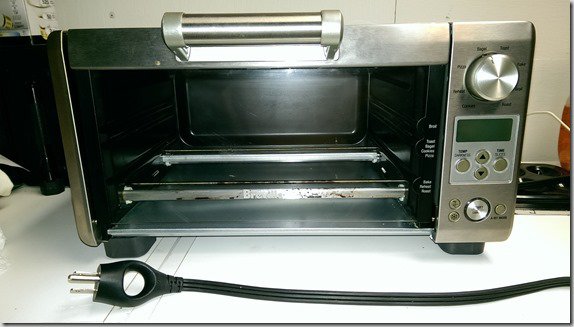
We have been enjoying using the Breville Mini Oven for about two years. It has not only replaced the toaster on the kitchen counter, but it has mostly eliminated the use of the large electric oven. The oven retails for about $150. A few weeks ago the oven suddenly went dead without a beep or anything on the digital display. We had usually unplugged the device when not using it to save the vampire power drain and avoid damage from the frequent 10 second power outages in our neighborhood. The handy plug with the hole in it made this an easy task.

Breville Oven Front View

The first thought was, oh maybe it’s just a fuse. But there is no user replaceable fuse. Searching the web did not turn up any information on how to fix the oven either. What I did find was replacement parts at a site called eReplacement Parts. They had a fuse assembly for the oven for just $4.57. With shipping it was almost $12 dollars. It was not in stock and they gave no estimate as to when they might ship me one. But it only took a couple of weeks before the UPS guy left one on the front porch. They also gave email updates on the order.

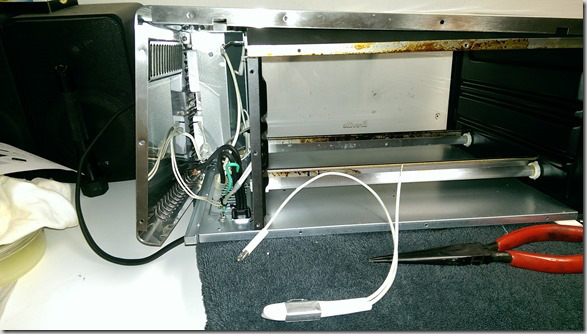
Then the fun begins with the disassembly of the oven. First remove all the exterior screws that hold the single piece of stainless that makes up the top and sides of the oven. This will just loosen it and allow you to bend out the sides for access. There are at least two screws that keep this wrapping attached to the chassis up near the front where the controls are. I figured if I took those two out I would never get them back in since there is so little room to work with. Remove the rear cover completely with the external screws. Luckily the fuse assembly is attached to the back left of the oven. Right below it is the temperature sensor. The fuse is temperature sensitive, that is why it is attached to the inner frame that gets hot.

The eReplacement page has a picture of the fuse assembly. You have just two screws that hold it to the frame and two wire connections. The first one is directly connected to the black power cord with a crimp connector. Connect the new fuse wire with a wire nut. The other end has a slip off terminal connector that attaches to a connector at the bottom front of the control assembly. The old one comes off easily with a tug using a pair of needle nose pliers. Getting the new one on that connector is the hardest part of the job. There is a connector on each side of your target connector, and the connectors are recessed.

Breville Oven Disassembled Rear View

Using Webstorm with Udemy AngularJS course by Dan Wahlin

I recently took the course AngularJS Jumpstart with Dan Wahlin on Udemy. Dan does a great job and I highly recommend it. In the course Dan uses the Brackets editor which has the advantage of being able to set your project as the root of the server. This results in addresses such as:

“localhost:8080/index.html”

I use Webstorm for Angular and JavaScript development. I could not find any way to get it to do this and ended up addresses like:

“localhost:63342/Angular/index.html”

The problem comes in when you use the node.js server for the course application. Changing the server port to use 63342 causes a cross domain load error. To get the application to work with Webstorm first modify the server.js node/Express file:

1
2
3
4
5
6
7
var allowedOrigin = 'http://localhost:63342';

app.get('/customers', function(req, res) {
// Add the following line to fix cross domain errors
res.header('Access-Control-Allow-Origin', allowedOrigin);
res.json(customers);
});

Then for each app.get in the file add the res.header line. There are other ways to do this such as using a router or a specialized middleware routine but this is the most straightforward way.

Next modify the customerFactory.js file to retrieve data from the 8080 port instead of defaulting to the application 63342 port:

1
2
3
4
5
6
7
8
9
10
11
12
13
14
15
16
17
18
19
20
21
22
23
24
25
26
27
28
29
30
31
(function() {
var customersFactory = function($http) {

var urlBase = 'http://localhost:8080';
var factory = {};

factory.getCustomers = function() {
return $http.get(urlBase + '/customers');
};

factory.getCustomer = function(customerId) {
return $http.get(urlBase + '/customers/' + customerId);
};

factory.getOrders = function() {
return $http.get(urlBase + '/orders');
}

factory.deleteCustomer = function(customerId) {
return $http.delete(urlBase + '/customers/' + customerId);
}

return factory;
};

customersFactory.$inject = ['$http'];

angular.module('customersApp').factory('customersFactory',
customersFactory);

}());

A Website Health Check Page

Over the last two years I have supported a multi-function web site with many application settings, three databases, and several external web services. The need to support this site on many different servers led to the development of a detailed diagnostic health check page for the application. Some of the servers are controlled by the customer which makes debugging problems more difficult since you have to coordinate changes with remotely located support persons in different time zones.

The health check we have developed is written in ASP.Net web forms but could be easily converted to an MVC format. The main purpose here is not focus on the presentation layer but to identify useful information to report and present some of the code used to gather information.

The page supports three options:

  1. Simple Health Check – A fast check that does a quick database connection check and returns a code of 200 if successful else a 500. This is performed if there is no valid query string values.
  2. Get Version – Returns a simple one line version of the application version. This is called by using a query string containing a “GetVersion” key with any value.
  3. Detailed Health Check – Does a detailed database check, web services check, and displays some non-sensitive application settings. Called by a query string containing “details” key with any value.

The Database Section
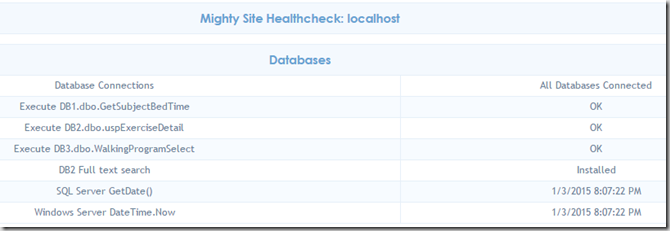
Database section

The header of the page is set to the site name constant, “Mighty Site” in this example. The current URL follows the site name. This is helpful if you have one or more instances open for different locations.

In this example we check three databases. The first check “Database Connections” is the same check called in the simple health check. The function CheckDbConnection is called for each database and attempts to open a new connection. Before trying, the connection timeout is set to 5 seconds. This keeps you from having to wait the standard 30 seconds if the connection string is bad or the database is down.

Next a random stored procedure is executed for each database. This tells you the database login you are using has execute permissions on stored procedures.

Our second database (DB2) needs full text search installed, which is not the default case when you install SQL Server. The GetServerProperty function in the Helper class is called to retrieve the server property “IsFullTextInstalled”.

The next two lines the the date and time of the SQL Server instance and the IIS server. In the example above, both are on the same localhost machine and are the same. But we did have one occasion when the database was on a separate machine and just a few seconds difference caused one pop up routine to go into an infinite loop.

Web Services

Web Service Section - Passing

The Mighty Site relies on a Single Sign On service to log users in, and a Data Service to get and update information about the users. The ServiceHealthCheck function uses the Web API Client to make calls to the health check on these services and looks for a 200 OK return code. If a service cannot be reached or returns a non-200 code, the row background will be pink and a DNS lookup is attempted on the URL.

Web Service Section - Failing

Application Settings

The application has many settings in the appSettings.config file and it is useful to see some non-sensitive ones on the health check page. You could also display database resident settings here.
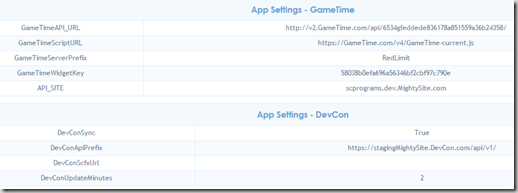
Application Settings Section

Version Information

The website maintains version information in the App_GlobalResources\About.resx file.

Version Info Section

Time Zone Information

Unfortunately the Mighty Site was written years ago by some folks who didn’t believe in using UTC date times. The system is based on the time zone where the server is located which causes a lot of headaches since different customers are in different time zones.
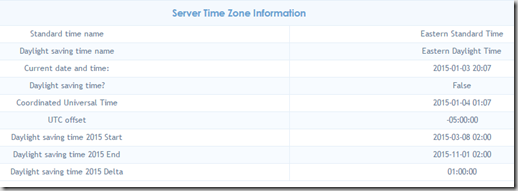
Time Zone Section

Conclusion

The ASPX file contains only a single line, the usual first line containing the Page, CodeFile, and other directives. All of the page content is generated in the code behind with the help of the functions in the HTML Tables region. The source code is available on GitHub.

VMware Standalone Converter Write Error

I have run the VMware Standalone Converter now from several different machines. Each time I get an error that the file

C:\ProgramData\VMware\VMware vCenter Converter Standalone\ssl\rui.crt cannot be opened.

The file is always there but cannot be accessed. The file properties always show Administrators have full access, and my current user is an administrator. Never the less, just set your logged in user to have full access to the folder and all will work fine.

Jungle Disk Service Hangs Up

I’ve been using Jungle Disk for nearly three years now for reliable, easy, and inexpensive cloud storage. The software uses Amazon S3 storage or their own Rackspace storage. Since I currently run five machines at home and one at work the network drive that Jungle Disk mounts is great for storing large files. It can also be configured to do automatic backups. For things that change everyday, I also run Windows Live Mesh.

Recently on my new Vista machine the Jungle Disk service would just hang in the starting state. I tried reinstalling several times with the same result. I resorted to the Jungle Disk help desk.

The first response was disappointing: make Jungle Disk an exception in the firewall and make sure ports 80 and 443 are open. Since none of the other machines running McAfee had this set, I didn’t think it would help. But of course I tried it to no avail.

I specifically asked how to remove all program information before the installation. Every time I tried reinstalling the software I was never asked for my Amazon S3 information. I had assumed it was a registry entry, but in fact for Vista it is stored in an XML file in C:\ProgramData\JungleDisk. Removing the files in that location fixed the problem and I was able to re-enter the Amazon information and run the program without the service hanging.

Only four or five hours of work for what I guess was a gamma ray striking some part of my disk drive since there had been no configuration changes or installs to prompt this behavior.

WinForm Design Mode Rendering Error

We recently upgraded our main application to the latest version of the Infragistics controls. Everything converted, compiled, and ran fine. However, when you tried to open some forms in the Visual Studio designer, you got the message “The path is not of a legal form”. Looking at the project for these forms, they had invalid references to custom controls that used Infragistics controls. I deleted the references and added the newly compiled versions to eliminate the designer rendering error.

Since we do not remove the previous version of Infragistics the older controls are found at run time.

Visual Studio 2005: Key not valid for use in specified state

We have recently migrated all of our workstations to a different Windows domain at our office. Some folks were getting the following error when trying to open a DataSet in Visual Studio 2005:

Key not valid for use in specified state

The problem can be caused by the change of a username from the old domain to the new domain. Visual Studio is not able to properly decrypt some its settings.

The fix is to rename/delete the following file:

C:\Documents and Settings\YOUR USERNAME\Application Data\Microsoft\VisualStudio\8.0\ServerExplorer\DefaultView.SEView

You will now have to add back all your databases to the Server Explorer toolbox (but you only have to add them at a later time as you need them).

Thanks to Robert Stam for this tip.

.NET Unable to Sign Assemblies or Read WSE Keys in Windows Server 2003

Recently we tried to build an older version of a system that is hosted on Windows 2003 server. Every project in the build would fail with Visual Studio unable to sign the DLL. Of course the DLL was not there in the target folder, but that was not the problem. The build had worked before we rebuilt the server.

A Google search produced a suggestion to change the file permissions on: >

C:\Documents and Settings\All Users\Application Data\Microsoft\Crypto\RSA\MachineKeys

We gave Administrators full access to the folders and were able to compile.

Just a couple of days earlier, I had to give IIS_WPG access to this folder in order for a web service to be able to read the keys and decrypt a WSE message. The service had worked fine after I had installed it and given access to the key file using the WSE key utility.

I noticed a pending Windows update icon was no longer in the system tray. It appears that update had tightened security on that folder.